the subject for tonight:
a modified chassis on the cheap!
ways of getting the rider forwards
cheating to get the 'load' on the front
a modified chassis on the cheap!
firstly I don't think I explained clearly enough how you can try a steeper headstock with your existing chassis without it costing a fortune! you'll have about 3 weeks good weather left this year so why not spend a couple of weekends getting the outfit ready and then go try it. go with another team; one altered, one standard and swop and try them together?
what you want is a steeper headstock and its going to take some 3-4 hours work but best to record everything you do on a sheet. I designed these sheets for myself about 14 years ago but you're welcome to them for free of course - cos I love y'all!
I can't put a word doc up here so this is a .jpg, if you want a copy just email
david@taffmeisters.co.uk it is an example of what I do to solos. changes since the last ride, then in 5 boxes at the bottom how each short ride wnet and changes made. all settings have a row of before boxes and then after. very handy for when going back to a track once per year?
one thing I would do though for ScX is have a before and after for the balance of weight of the outfit with rider and passenger aboard - that is balance between the three wheels. you've also got to add the third wheels supension settings, then there is wheel sizes. there is probably no need for you to know the shim stacks inside the shocks but you do need to know which set of shocks are fitted. use a stick between your headstock and the riders navel and do it the same everytime. 1cm is one kilo...so is the stick funny now? yeh I think it is too but you know... do this in the privacy of your own shed OK....no one need see!

by the way, I used to use the scales at a waste paper merchants between fork lift drivers mowing me down (unsighted of course), brilliant set up: one wheel on, then the second, sit forward - sit back and watch the scales move.

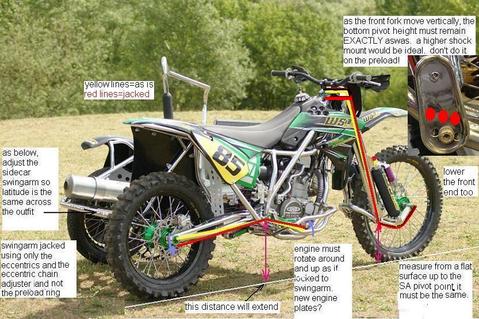
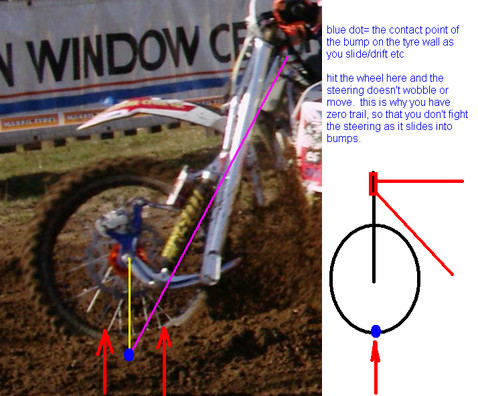
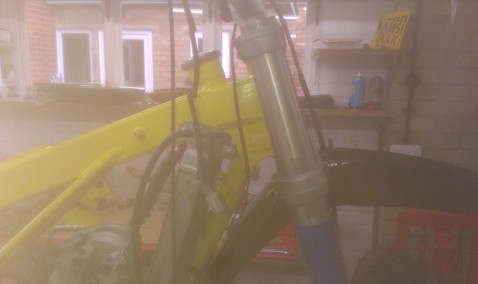
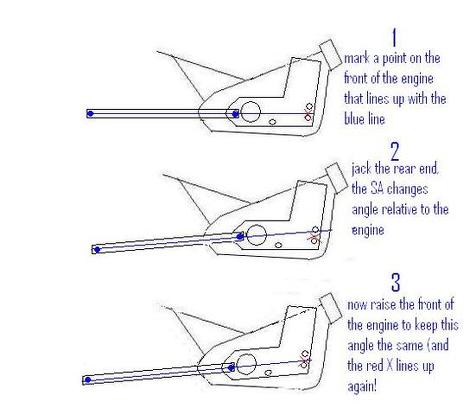
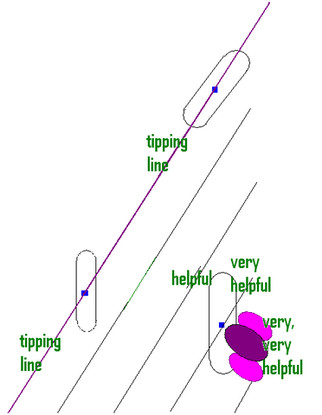
look at the above photo carefully and the yellow lines; they represent the bike as it stands in the photo. so the yellow line is the angle of the swingarm etc
the red line will be the new angle of the swingarm. to put the end line back on the wheel spindle means the SA pivot will be jacked up higher, you'll have to imagine that!
the engine needs to be at the same angle inrelation to the swingarm as it is with the yellow lines so that means that the front of the engine must be lifted on the front engine plates etc.
at the forks, because you have jacked the rear, the red line is now ahead of the yellow line - the new position.
By drilling the pivot holes higher at the base of the fork legs you can see the red of the legs now below the front SA pivot. but the swingarm is in EXACTLY the same position horizontally - this must not move!
if you look at the top of the front shock mounts, the old (yellow) holes are below the (later) red holes.
The front swingarm is in exactly the same place and level as before. so i've shown the red and yellow lines almost on each other.
firstly, to drop the front end making the steering steeper. measure from the workshop floor up to the front pivot bolt. the pivot and the front arm must be the same height off the ground after the forks have been dropped as before.
for every degree you change the headstock angle, the trail will change by about 2mm. so if you steepen the outfits headstock by 2.5 degrees, you must put the front wheel back 5mm to get the same TRAIL. the next year, you ask for this new headstock angle but with the headstock another 5mm further forwards and then you have the trail you wanted but also your original wheelbase and balance back etc. remember these are isolated tests to see if there is an advantage and not the end of the test.
have you got a digital spirit level? £24 from Hong Kong on ebay! - get one!
http://www.ebay.co.uk/itm/Digital-Angle ... 5d508ec4a6
you put one part vertically and the other against a forward facing panel but in line with the wheels - measure the angle, doesn't matter what it says coz you want a before and after figure! sure it is nice to know the headstock angle but it is a round tube with bumps....not so easy for consistant results.

the downtube going uner the engine might be a good one?
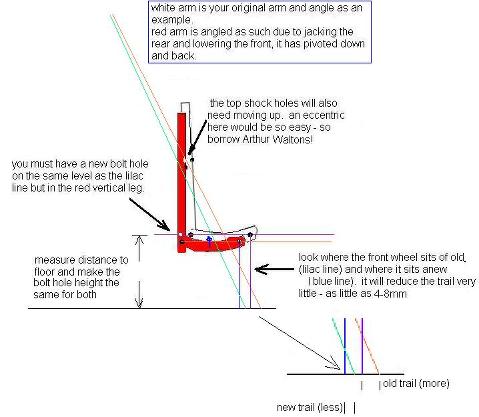
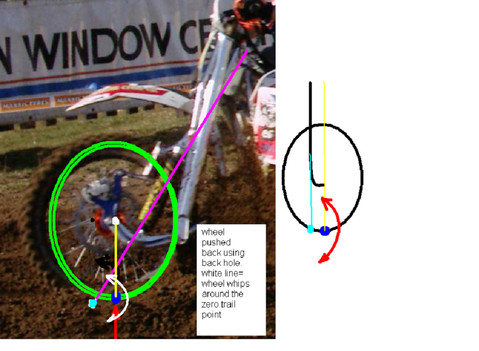
we don't want to disturb the angle of the bottom arm or the suspension, so you need to drill new holes. look at the photo below and note that the red holes are all above the originals and about 5mm backwards. this is correct for the same trail give or take a millimetre.
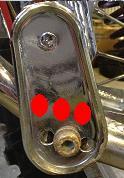
(photo courtesy Jones, A.'Bromhead' VC DFC GC)
drill the holes as much higher as you can or dare on the vertical forks or if you have shorter shocks by 30mm then do the holes 30mm higher if you can and go to the shorter shocks straight away. even if you don't play with the rear you have simply drilled a bunch of holes at the front and used your shorter shocks for a test!
if you don't have shorter shocks then re-bolt it together and you need to get the shock(s) top mounting higher up the legs if you can, if you have drilled the fork leg holes 15mm higher then ideally you'd have the top shock holes 15mm higher. ALL THAT HAS CHANGED IS THAT THE FORKS ARE NOW IN THE RED HOLES FROM THE DIAGRAM. the horizontal arm should be the same distance from the ground.
at the rear
there are two ways of jacking the rear:
1) any kind of jacking you can do without touching the suspension. get the arse end up. taller rear wheel and tyre? eccentric chain adjusters with the wheel spindle at 6 o clock? eccentric on the shock linkage system? some people have a linkage that jacks the rear? longer shock? just get it up!
2) put lots of preload on the spring and prepare for a bumpy test? (try to avoid this one unless you know how to separate suspension from handling when testing).
then jack the chair wheel as well as best you can. best is if you had a taller wheel/tyre, great! 16" to 17" for one test? the SA is so short it'll slightly change the way it works otherwise. I once saw someone had welded a whole new eye for holding the wheel underneath the sidecar platform! do it if you can as you don't want the outfit to lean left or right anymore than you had it before. you are trying to isolate the test to one area.
if the worst comes to the worst you can harden the rear suspension a little and soften the the front a little (say one turn of preload max). please take this into account later.....

finally, if you have jacked the swingarm on the rear AT ALL, you must raise the front of the engine. this must be treated as if you had a siezed engine to swingarm so that as the arm points steeper down to the rear wheel, the more the engine pivots up. a simple system is to use an enormous ruler and mark two points on the SA and the third right at the front of the engine.
so now you have jacked the outfit what does that mean?
you should weigh it again with the crew on board (using the belly stick!) and the weight will have gone to the front significantly.
more weight on the front is more grip.
what happens to the geometry?
if you jacked the rear without touching the shock then did the engine position and the passnegers wheel as well = you haven't done too much, you have raised the C of G about 10mm I suspect.
you will have less trail by about eeeewee? say 4-6mm.

to get this back, which you should ideally do, you would make sure that the red holes are not just higher than the orignal holes below but back a little, by say 5-6mm. this gives the same trail as before.
if all you are doing is jacking the rear for this test to steepen the headstock, the trouble is, to get the trail back you need to go back a hole on the forks. sadly, a hole is about 15-20mm (centres) and NOT the 3mm you were looking for. by the way, if you do only one end it is 3mm lss trail, if you do both it is then 6mm.
if you'd had eccentrics like I keep telling you to, this could be just a 'turn and lock' and away you go....

another way of getting the trail right is to take a measurement off the front engine bolt to the wheel spindle and work it out as this is a "constant".
this whole test is about weight on the front. if you like it and the digital spirit level says you jacked the outfit by about 2 degrees, and you're happy then keep it!
and don't complain about the suspension if you adjusted it: "oh it handles like a dream but its too hard now! - lets call the test a failure then shall we?"

separate suspension from handling!!! if it handles better, change the suspension afterwards!
if you really, really like it then re-weld the platform and rear subframe lower again. get the rear suframe down to the same distance over the rear spindle nut again that you measured from. it's not rocket science....and the platform as well for the passenger otherwise he'll need a ladder just to get on the back!
order next years chassis with the new superdupa headangle - and 5-6mm further forwards to get the same wheelbase back.
getting the weight further forwards (without rabbitting on about the rake this time...  )
)
I said that the rider needs to get further forwards all along and failed to point out that the outfit would tip over if the passenger came with him.
firstly, what can you do without separation of rider and passenger?
so how can you cheat the system? well, here are three easy enough reasons and a fourth at the end
well the handlebars are perhaps too high? if the hands are above the elbows there is no downward pressure.
just as an experiment on that weigh bridge I mentioned at the papermill: turn the bars upside down and ask the rider to lean into them - straight away a 3 -5 kilo transfer to the front! I know it, I've done it. all the rider will needs to do is stoop more on landing jumps - simple as - after throwing themselves into the radiator: this is no problem!

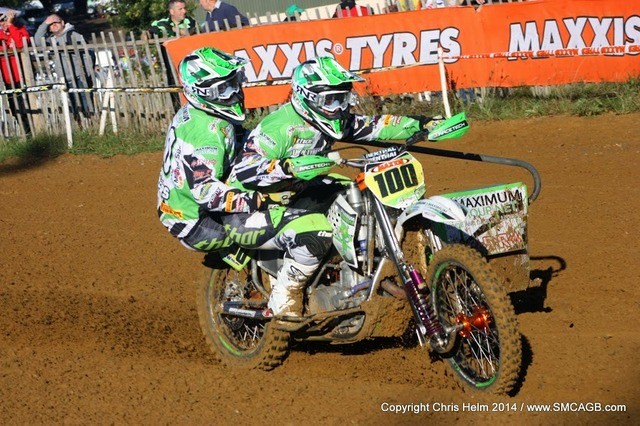
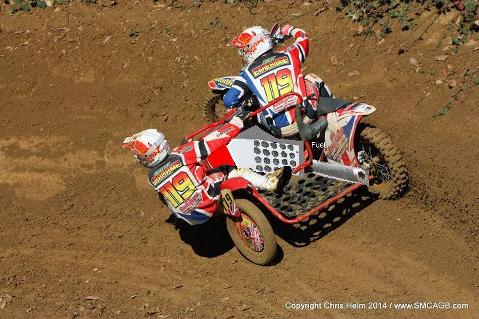
(thanks to Chris Helm)
the handlebars would have to come down and back a little due to the 'whip' when landing a jump. look up the list of bars available from Renthall, they give you height, sweep, width etc.
secondly, move the fuel tank from its traditional place and then extend the seat forwards and down. the rider weighing 180LB makes the biggest difference and every CENTREMETRE is a kilo.
thirdly, sit lower still if you can and get the frame designed with this in mind. there is no need for these high frames when all you are doing is connecting the headstock to the SA pivot. that's all you are doing. the rest of the frame is "ancilliaries" after this.
these three above start to change things.
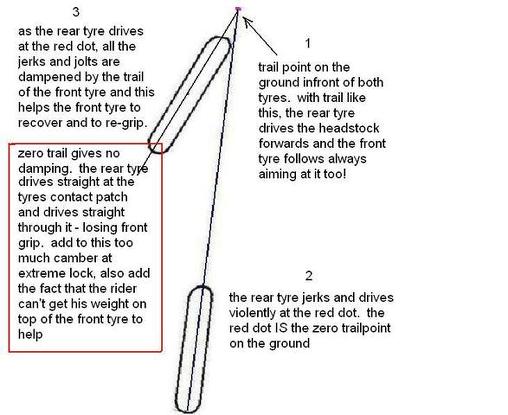
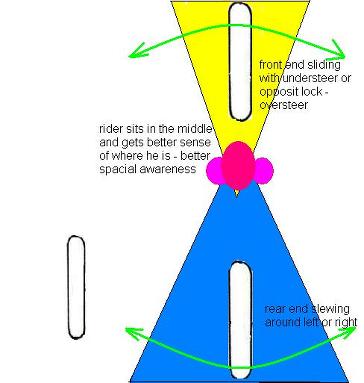
pendulem effect
this splitting of the rider and passenger creates a pendulem effect as said 2 weeks ago - not good after the apex. here below is why the rider loves to sit in the middle and be in control of all his senses, peripheral vision, awareness, horizons etc:
interestingly just when you think about looking at racing cars etc, it is bikes that come closer to our sport!
MX riders slide back and forwards
speedway riders slide back and forwards
roadracing sidecar passengers slide back and forwards
anyone not strapped in in a 4-wheeled sport MOVES AROUND.
so ScX rider's need to too! there's no rule against a 'driver' being forwards of centre. Alan Jones et al from the 80s in F1, Novalari in the pre-war Auto Union etc all were on the front axle.
the fourth thing you can do is
'MASS CENTRALISATION'
if the rider wants to sit further forwards we need 'MASS CENTRALISATION' between all 3 axles. with the radiators back we can send the rider forwards.
how do you get that?
really, really easy! - on paper! the theory is easy - doing it is another thing LOL!!!
as an experiment, some of you have a sidecarX outfit MODEL right? you know...6" long and 2" tall sits in the window cill at meetings. hang it up by a cotton thread at three points and draw the lines similar to the engine photo below. where these three lines cross is the C of G in plan (2D, not 3D OK?)
you all know a workshop with a hoist right?
you remove all fluids and then hang the outfit at three different points. let us say from:
the headstock,
the platform near the rear wheel spindle.
the sidecar SA pivot.
three static and solid points that aren't moving. if you could freeze in mid air all three pieces of string, they would all meet at one point!
I did it just a week ago for Dutchman who came and stayed to study all these things and we did it to my 570 engine. as you can see, we hung it from a doorway and felt-tipped the engine cover, look how accurately all three lines intersected! sorry about the quality...

the lines all converge to one point. I can't give you the centre of gravity of that engine because it is inside the engine but we can find the C of G on a sidecar because it will be in mid-air. we could do it on an outfit so you get the true CoG in 3D.
if you doubt this, ask yourself where the centre of gravity is of a horseshoe or a dougnut! it's somewhere in the middle - in mid air!
you hang the sidecar and a plumbob from a hoist. make a note of how far above and over a wheelarch etc the plumb bob is and then do it the three times. afterwards you get three people to hold three pieces of string at the same angles and they will all meet at one point over the chassis somewhere! measure it, mark it, note it.

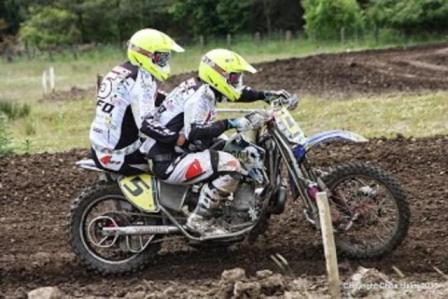
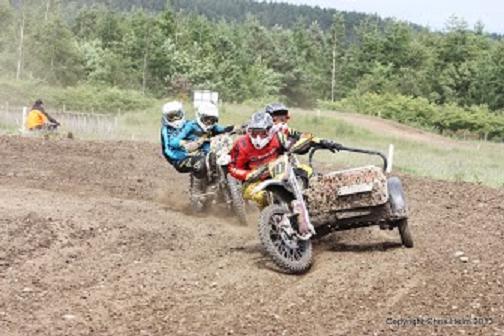
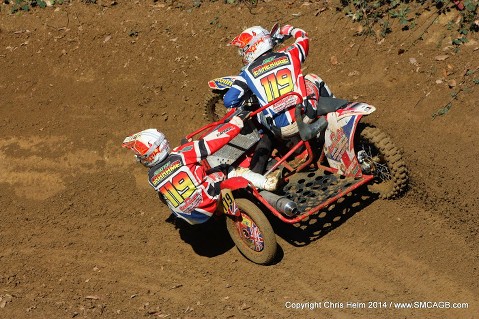
what you want is as much weight around this single point as possible - fuel especially so that the weight of the outfit, its balance is the same from the start of the race to the end so that the rider can always ride hard! below is a photo from last weekend (thanks to Chris Helm)
if you look, there is a dusty area that Scott, the passenger, hasn't walked on the platform.
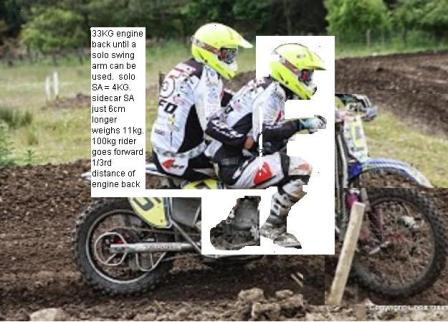
failing all the above you need to think about splitting the rider and passenger up. do it by the minimum but the diagram below shows that the passenger has greater effect the further back he goes.
think of this film...
the italian job
the final scene
the coach over the mountain's edge (Michael Caine: i've got a good plan lads...)
8 can't go after the gold but 1 can if the other 7 go and stand with the driver right?
back to ScX....
so the rider can move forwards and the passenger can adjust by coming towards the rider on some corners and away from him on others.
on a
tight right hander where the outfit suffers from understeer, the rider moves forwards but the passenger must move or 'adjust' so the rider is safe. This is just like roadracing. with the rider trying to get as much grip forwards as possible, the passenger adjusting his position by 'feel'.
as you can see from the diagram, for the passenger, the further back, to the right and down low, the safer the outfit. now don't get me wrong, the less the rider and passenger are apart the more centralised the 'mass' of the crew. so the diagram is an exageration so you understand the maths of it. if the other things I have recommended here worked first then it is all worth it, right?

why do they have to be together, why not apart at the apex and then back together leaving the corner?
the rider's weight will always want to tip the outfit over BUT he is stuck steering the outfit so the passenger's weight DOES matter because he can move away. the bottom line is that only 'X' amount of weight can move forwards without it tipping the outfit over but you can move it forwards as long as it moves Forward and DOWN!
the only difference is that the passengers force outwards is protected by the passenger wheel. having lots of trail would also do this but that is another story...
(imagine you are sat on a supermarket trolley and you are right at the front turning right, as you turn right your left front wheel has moved
outside the trolley and now you are less likely to fall over! whereas if the left wheel just pivoted under its axis, the wheel is still
under the trolley).
back to the mass centralisation idea....
below is an airbox idea with the radiator in the middle of the bike. under the rider's thigh is the fuel INBOARD of the bike. the exhaust can has been put by the rear wheel to help - well you guessed it - right handers!
add these ideas together with this design:
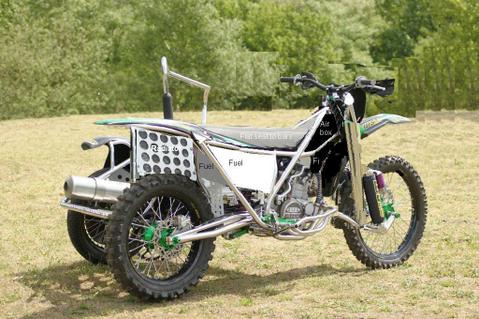
the fuel tank is gone, the steering more upright, the rider is lower and can move backwards and forwards. the passengers tail piece is super-extended for those hairpins to the right so he can sit back further all on his lonesome. polish it up and he could slide forwards after the apex and join the rider. the radiator, nearly under the mudguard is there just as another option - just for kicks! by the way, if you take passengers and low CoG seriously you would have a mudguard with the high point in the middle and not a duck tail with high edges as at present ...... that way the rear tyre would come up and INTO the rear subframe tubes..... seriously, what a cock-up!

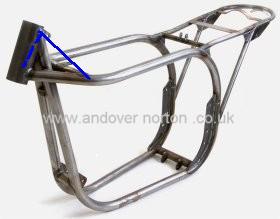
below is a greeves, the rear subframe could be lowered so that the rear wheel pounded up INSIDE the rear subframe. make that mudguard out of plastic - passenger slides too-and-fro what? 3" lower than before?
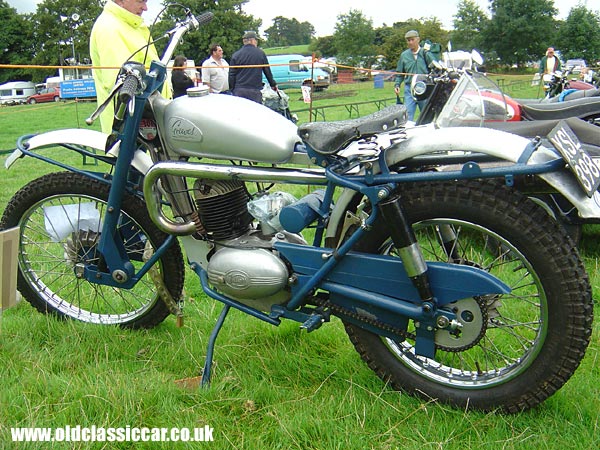
no jokes about asking you all to win on a Greeves PLEASE!
I took this photo in 2009 while helping Mark Kinge. I couldn't understand it then and 5 years later I still don't understand it.
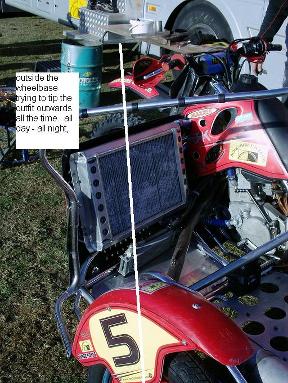
what is the radiator doing here! outside the wheelbase? and riders say that they can't move forwards!
so what goes wrong when outfits try to to tip over going around a right hander?
if you have a big heavy rider, the passenger must be big and heavy as well to counter balance him.
if the rider is light (and young like 3 of the young GP brigade are) then he'll probably suffer from a lack of front end grip because he just can't get enough weight ON THE FRONT WHEEL to weigh it down.
if he's tall, and built like a welsh pit prop (Aled!) and his passenger is also big then the trouble may not be front grip but the TIPPING ACTION because having got the grip with the weight, the outfit then wants to tip because riders sit high up! the difference is weight and where it is: the crew weight is always high up. it's
because the rider is heavy that he's getting grip. its
because it is high up that it is tipping over!
in the future: frames that therefore link the headstock with the swingarm pivot allowing the rider forwards while staying low are therefore vital. the rider must be able to move. the fuel tank
must LEAVE the headstock area. if you have a 4T Fi then it doesn't matter two figs where the tank is because you have a fuel pump anyway!! do they have the internet in Frome?
none of the above is about running lots of trail this time, its about simple stuff that you should be looking to do anyway. it has nothing to do with the chair wheel and the compromises that you have to make there.
regards
Taffy